


Refreshed and republished on October 4, 2020
This post was originally published on February 25, 2016 and has been revamped and updated for accuracy and comprehensiveness.Pardot offers 2 methods for embedding forms on your website; embedding using an iframe, and form handlers. While the embedded iFrame forms allow marketers to have control over updating and configuring the forms, using an iFrame isn’t always ideal for website usability. In this tutorial, I will show you how to take advantage of the Pardot iFrame forms and make it look great embedded on your website.
Why Use Embedded Pardot Forms?
Using Pardot forms over Pardot form handlers have many benefits including:
- Allowing for progressive profiling
- Built-in email validation
- The ability to use the drag and drop editor to modify form fields
- Add/remove form fields easily and have the changes show up on your website instantly
Embedding Pardot forms on your website
The problem
The embedded Pardot form (which is in an iFrame) has to have a set height. This means that when you embed the form you have to calculate the height (in pixels) and update the code Pardot provides accordingly.
Example
If you add any additional fields to the form, the height of the form will need to change. You also need to accommodate for the built-in validation messages which can cause the height of the form to change as well.
The solution
Automatically resize the iFrame using Javascript. Even if you’re not a developer, it’s pretty easy to implement since is just copy and paste.
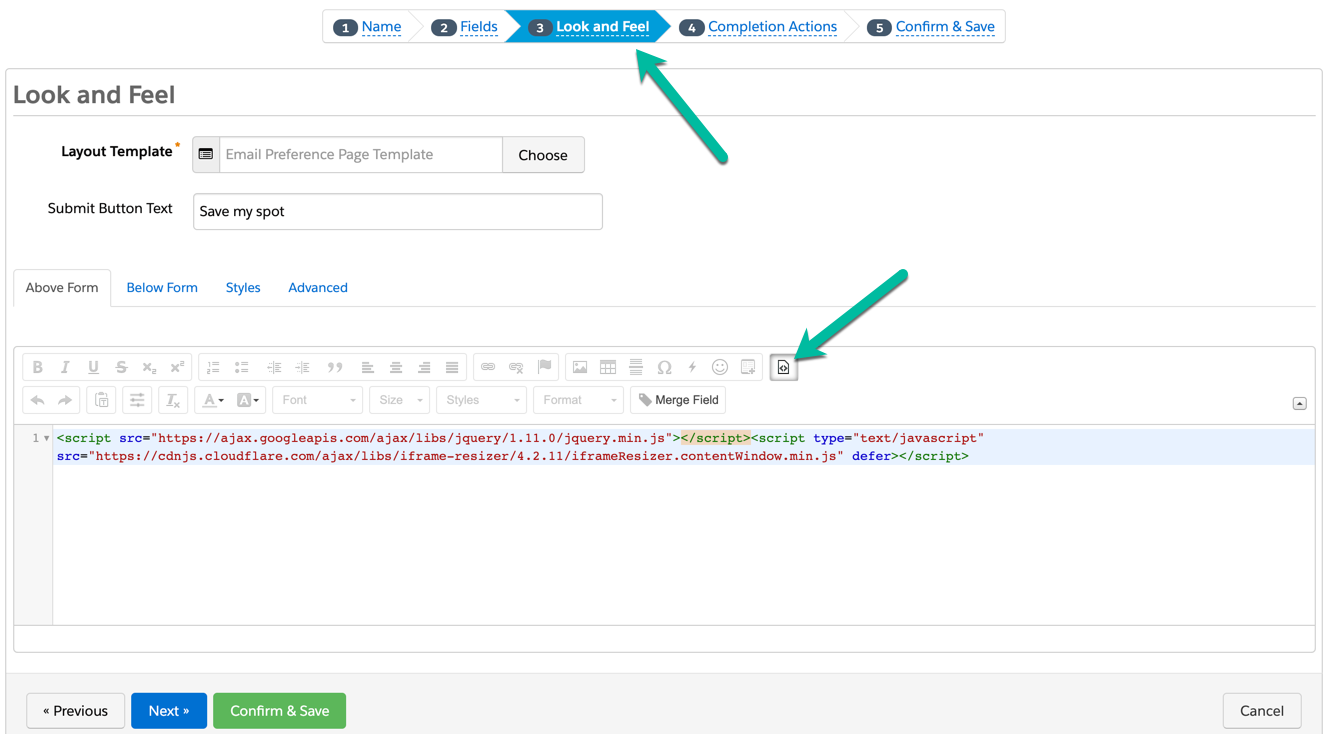
Step 1: Add some code to your Pardot form
Navigate to your form in Pardot and paste this code in the look in feel section by clicking on the HTML icon.
Step 2: Download the plugin and add jQuery
Download this file and link the javascript on your website. Or link this hosted verison on your website like this and add the jQuery plugin.
Step 3: Embed the form on your website
In order to embed the Pardot form on your website, you will need to grab the form URL from Pardot. Navigate to the form overview page and copy the link provided
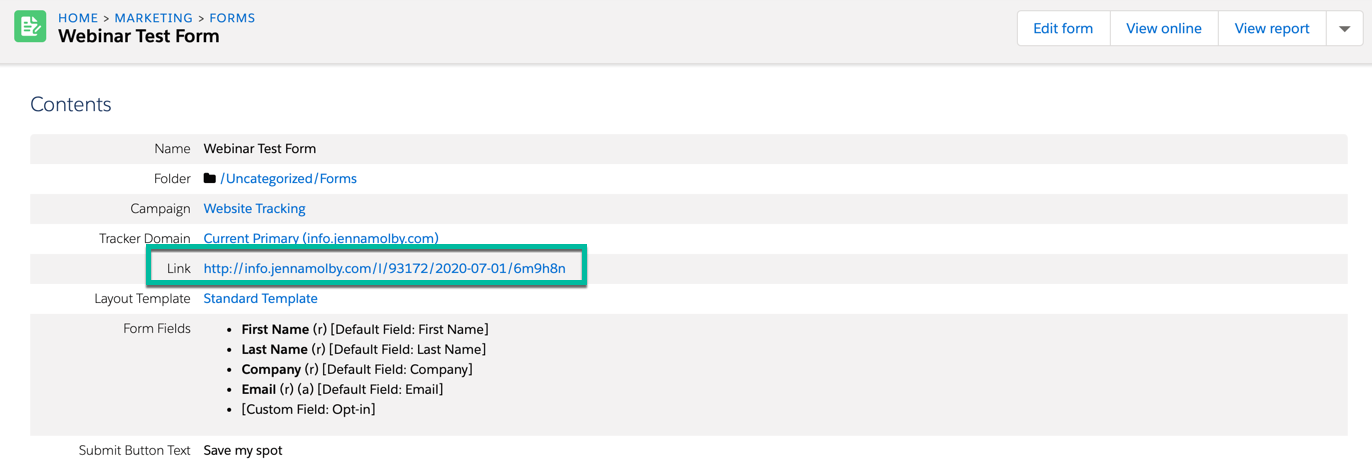
Add this piece of code where you want the form to appear on the page. Replace the URL with the URL you copied above.
Lastly, add some custom javascript to your website to initiate the iFrame resizing.
Here’s the completed website code:
Pardot iFrame Resizing
That’s it!
Your embedded Pardot form should now adjust based on the content. Have questions? Send me a tweet @jennamolby, leave a comment below, or book a Peer Chat.

48 Comments
Hi Jenna. This script is very helpful! Very happy to eliminate the white space underneath our Pardot iframes and have them auto-resize when for error messages.
One thing I’ve noticed though with hidden fields – The script seems to automatically insert white space at the bottom of the form to account for hidden fields as if they’re already being displayed. For example, the height on one of our forms should be 549px, then grow to 646px when the hidden fields are displayed, but it’s starting out at 646px as if the hidden fields are already showing.
Interestingly, Internet Explorer seems to be the only browser that sets it properly and ignores the extra height needed for the hidden fields until they are actually generated on the form! Is there any way to get the script to ignore the height needed for hidden fields until they actually load?
Hi Jenna,
I needed help fixing my website forms. Following the above technique, I have done the Step 1 but could not figure out whats step 2 is, Step 2: Download the plugin and add jQuery. After downloading the plugin, where should I the jQuery and downloaded plugins? Can you please elaborate it for me.
Thank you.
Hi Bikalpa, if you decide to download the jQuery plugins instead of using the links provided, you need to upload them to your website’s server and link them accordingly.
This is helpful, but how can we integrate this method if we have multiple iframe in one page? In my case all form/iframe have the same height values. Can you help me achieve my issue?
Thanks
Hi John, Yes, you can use this method if you have more than one iframe on a page. You would need to give your iFrames two different IDs and modify this line of the javascript to include both IDs: document.getElementById(‘sizetracker’).style.height = e.data + ‘px’; Cheers, Jenna
Hi Jenna,
Thank you for this awesome trick. It has worked perfectly on all of our forms. Except, apparently, in Chrome (up to date; version 65.0.3325.146). In Chrome the iframe has a fixed height that holds a little more than four fields, and NO scrollbar. Given that browser’s unfortunate popularity, this is a pretty big problem! Do you have any tips on how to fix this?
Nicely put. Thanks!
Danny 🙂