

This month I was challenged with creating a landing page for event registration using Pardot. The event had 15+ roundtable sessions in the morning (within 2-time slots) and an option to register for the afternoon session (keynote, happy hour etc). Here’s a sneak peak into how I built it along with some code if you want to try building something similar for your next event.
How it Works
Before we get into the details, here’s a high-level breakdown of how the page works.
- A user clicks on the ‘register’ button to sign up for a roundtable, the roundtable name is populated in a hidden form field.
- A user clicks on the ‘register’ button to sign up for the conference, a hidden form field is set to TRUE
- A user then enters their information into a form. The data is sent to Pardot using a form handler.
- Users who signed up for at least one roundtable are sent a Pardot email that contains a thanks for registering message, the name(s) of the selected roundtable(s) and a calendar invite.
- Users who didn’t sign up for any roundtables, but signed up to attend the conference, are sent a thank you email with a calendar invite.
Pardot Setup
Field Creation
First, I needed to create a couple of new fields in Pardot:
- Roundtable Name 1: This field will contain the name of the roundtable the attendee selects for the first time slot.
- Roundtable Name 2: This field will contain the name of the roundtable the attendee selects for the second time slot.
- Registered For Conference: This field is a checkbox (true or false) which will indicate that the attendee has selected to attend the conference.
Form Handler Setup
I opted to use a form handler instead of a Pardot form, so I could easily customize my form.
Field Mappings
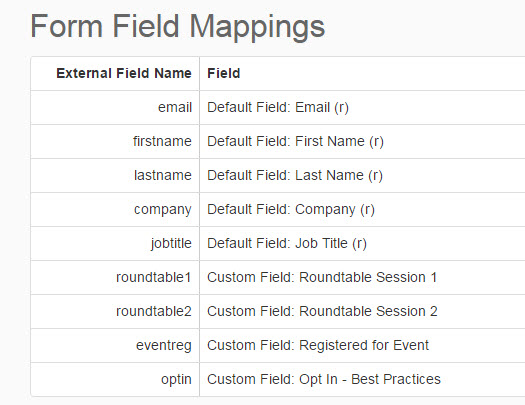
I added all the standard fields to the form handler (first name, last name, company name, job title, opt-in, and email address). I also added the 3 new custom fields (roundtable name 1, roundtable name 2, registered for conference) and marked them as not required since the attendee doesn’t have to go to all 3 events.
Completion Actions
I added 2 completion actions, the first one is to sync the prospect to an SFDC campaign with the status of registered, the second completion action is to send me an email alert when someone registers. The email notification helped me easily determine which roundtables are most popular.
Thanks for registering email confirmation
I created 2 ‘thanks for registering emails’ and set them up to be sent via an automation rule.
- Conference Only: This email is sent out to everyone who didn’t select to participate in any of the roundtables.
- Roundtables: This email is sent out the everyone who registered for at least one roundtable session.
Conference Only Email
The conference only email was pretty simple. It contained a thank you message along with calendar invites.
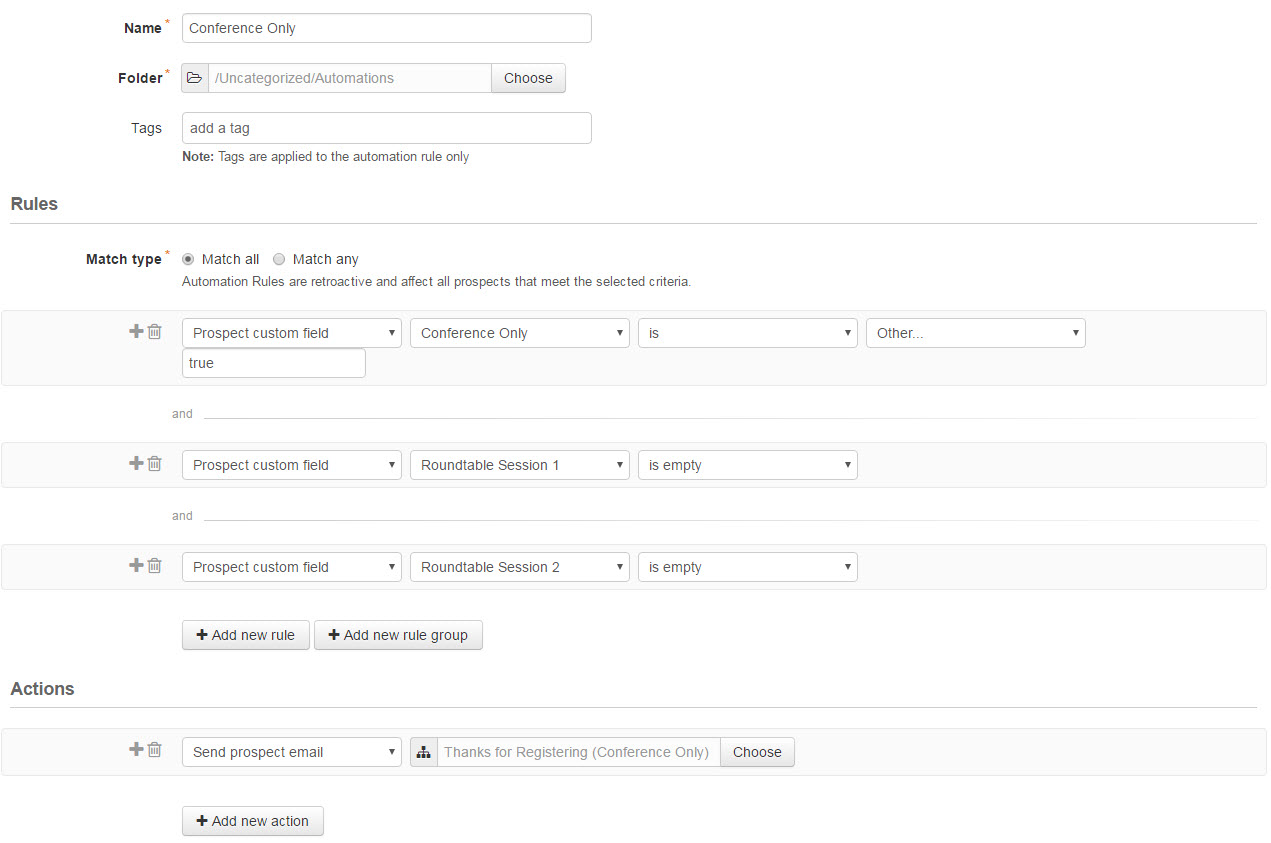
The email was sent using an automation rule that checks if conference only is true and if both roundtable fields are empty.
Roundtable Email
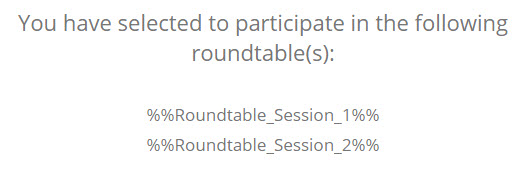
The roundtable email contains a thank you message as well as the name(s) of the roundtables the user has selected to attend. The names of the roundtables are dynamically added to the email using a variable tag.
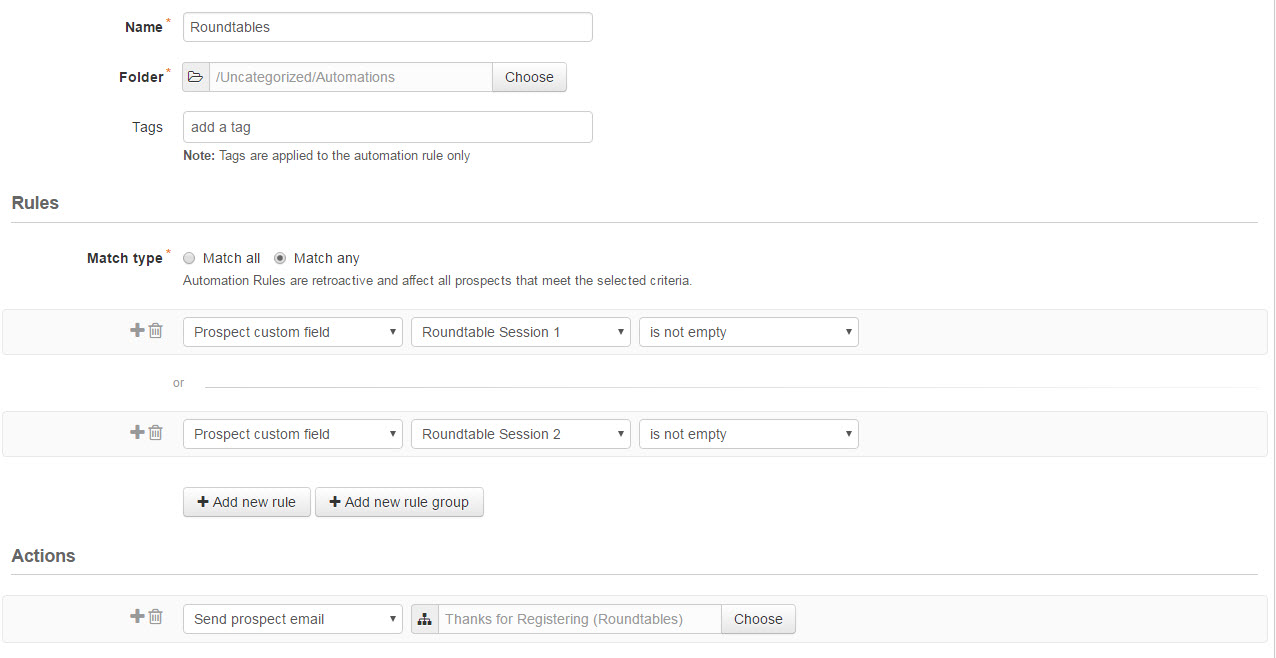
The email was sent using an automation rule that checks if the roundtable 1 field is not empty OR the roundtable 2 field is not empty.
Building the Landing Page
Building the landing page was the difficult part. I didn’t want to include the roundtable names in a drop down menu in a form, so I came up with the idea to make the registration process like a shopping cart.
The HTMLI used Bootstrap as my framework for the landing page and used Bootstrap Panels for a clean way to display the roundtable names and descriptions.
Session 1
Pellentesque tempus aliquet nisi in sollicitudin. Aliquam tempor ligula vel mattis cursus. Cras lacus est, facilisis feugiat rhoncus ac, condimentum a ex. Aliquam elementum, nisi non dapibus dapibus, neque mi mattis libero, nec mattis tortor elit ut sapien. Donec nisi nulla, feugiat non dignissim aliquet, efficitur eget lorem. Proin id pellentesque ante.
Since there were 2 timeslots for the roundtables I wrapped each of the sections in a DIV with a class of first-session and second-session.
Session 1
Pellentesque tempus aliquet nisi in sollicitudin. Aliquam tempor ligula vel mattis cursus. Cras lacus est, facilisis feugiat rhoncus ac, condimentum a ex. Aliquam elementum, nisi non dapibus dapibus, neque mi mattis libero, nec mattis tortor elit ut sapien. Donec nisi nulla, feugiat non dignissim aliquet, efficitur eget lorem. Proin id pellentesque ante.
Session 2
Lorem ipsum dolor sit amet, consectetur adipiscing elit. Maecenas lacinia, dolor scelerisque commodo sodales, augue lectus luctus turpis, id pharetra mauris libero at urna. Vestibulum in magna aliquam, interdum diam eu, pretium odio. Curabitur a porta metus, eget porttitor nibh. Maecenas porta condimentum lacus, in bibendum augue euismod sit amet.
Session 3
Phasellus nec neque scelerisque, semper odio a, fringilla leo. Sed cursus lectus non purus cursus tempus. Cras eu blandit lectus. Proin sodales justo et felis consectetur, sed ultrices nibh imperdiet. Vestibulum ante ipsum primis in faucibus orci luctus et ultrices posuere cubilia Curae; Sed aliquam congue feugiat. Nam elit orci, congue et maximus sed, commodo quis arcu. Suspendisse iaculis eros viverra consectetur pretium.
Session 4
Cras sapien leo, sodales vitae congue quis, semper ac ligula. Integer molestie fermentum suscipit. Cum sociis natoque penatibus et magnis dis parturient montes, nascetur ridiculus mus. Nulla odio ligula, aliquam eget leo eget, sollicitudin fringilla ante.
Sticking with the ‘add to shopping cart’ feel, I wanted to add a your agenda section to the bottom left corner of the page that populates based on the sessions you select. This can be done using my slide out lead generation form with a couple modifications.
Finally, I added the form to the bottom of the page, which uses a Pardot form handler and hidden fields for roundtable name and conference registration.
JavaScript
I used jQuery to add some logic to my page. There was a fair bit of logic to consider for the roundtable registration, including:
- Changing the button style when a session is selected.
- Hiding the rest of the ‘register’ buttons within that time slot, so the attendee can only select one session.
- Displaying the name of the selected roundtable in the agenda section.
- Populating the hidden fields with the name of the selected roundtable.
// Show the Agenda
$('.btn-select, .btn-conference').click(function(event) {
$('.slideout-form').slideDown();
})
// Session Selection Session 1
$('.first-session .btn-select').click(function(event) {
event.preventDefault();
$(this).addClass('session-selected');
$(this).removeClass('btn-select');
$(this).text('selected');
$('.first-session .btn-select').hide();
var selectedsession1 = $(this).closest('.panel').find('.rountable-name').text();
$('.session-name-1').html('9:00am - 11:00am
' + selectedsession1 + '');
$('input[name=session1]').val(selectedsession1);
});
// Session Selection Session 2
$('.second-session .btn-select').click(function(event) {
event.preventDefault();
$(this).addClass('session-selected');
$(this).removeClass('btn-select');
$(this).text('selected');
$('.second-session .btn-select').hide();
var selectedsession2 = $(this).closest('.panel').find('.rountable-name').text();
$('.session-name-2').html('11:00am - NOON
' + selectedsession2 + '');
$('input[name=session2]').val(selectedsession2);
});
The entire HTML code
I created a new landing page in Pardot to host the registration page. All the CSS, javascript and Bootstrap files were also uploaded in Pardot to keep everything in one place.
Pardot Event Registration Inspiration
Example Pardot Registration Page
9:00am - 10:00am
Session 1
Pellentesque tempus aliquet nisi in sollicitudin. Aliquam tempor ligula vel mattis cursus. Cras lacus est, facilisis feugiat rhoncus ac, condimentum a ex. Aliquam elementum, nisi non dapibus dapibus, neque mi mattis libero, nec mattis tortor elit ut sapien. Donec nisi nulla, feugiat non dignissim aliquet, efficitur eget lorem. Proin id pellentesque ante.
Session 2
Lorem ipsum dolor sit amet, consectetur adipiscing elit. Maecenas lacinia, dolor scelerisque commodo sodales, augue lectus luctus turpis, id pharetra mauris libero at urna. Vestibulum in magna aliquam, interdum diam eu, pretium odio. Curabitur a porta metus, eget porttitor nibh. Maecenas porta condimentum lacus, in bibendum augue euismod sit amet.
Session 3
Phasellus nec neque scelerisque, semper odio a, fringilla leo. Sed cursus lectus non purus cursus tempus. Cras eu blandit lectus. Proin sodales justo et felis consectetur, sed ultrices nibh imperdiet. Vestibulum ante ipsum primis in faucibus orci luctus et ultrices posuere cubilia Curae; Sed aliquam congue feugiat. Nam elit orci, congue et maximus sed, commodo quis arcu. Suspendisse iaculis eros viverra consectetur pretium.
Session 4
Cras sapien leo, sodales vitae congue quis, semper ac ligula. Integer molestie fermentum suscipit. Cum sociis natoque penatibus et magnis dis parturient montes, nascetur ridiculus mus. Nulla odio ligula, aliquam eget leo eget, sollicitudin fringilla ante.
11:00am - Noon
Session 5
Donec aliquet arcu at risus consequat mollis. Morbi suscipit ipsum commodo posuere faucibus. Mauris dui lacus, accumsan sed sollicitudin eget, placerat a velit.
Session 6
Nam congue quam non elementum placerat. Vivamus egestas, ante sed imperdiet fermentum, tortor libero fermentum magna, nec bibendum mauris lacus vitae ante. Donec eu leo volutpat, consectetur libero eu, porttitor dui. Mauris nec ornare ligula. Morbi et massa viverra, malesuada velit id, faucibus metus. Duis consequat tincidunt blandit.
Session 7
Sed turpis nisl, efficitur pharetra hendrerit ac, gravida id mi. Duis elementum velit nec risus aliquet congue et non dolor.
Register

10 Comments
Hi Jenna, will it be possible to track RSVPs (option yes and No) and set the corresponding status in the Salesforce campaign base on the answer?
Hi Maida, Yes, you could use automation rules to add prospects to a campaign based on their answer.