

In this tutorial you will learn how to use a Pardot form to gate content on a page. Gated content allows you to capture a lead’s information, by asking them to provide contact details before accessing a piece of content that is valuable. Instead of creating more than one page for the gated content and form, this tutorial will focus on creating a popup on the page that contains the asset.
The Concept
Here’s a high-level overview of what the user will expereince when visiting the gated page:
- The user visits the page and is greated with a popup containing the Pardot form.
- The user must complete the form in order to view the entire page.
- Once the user fills out the form, they are redirected to the asset page.
VIEW DEMO *
* Note: The demo DOES NOT use a Pardot form, but is simulated the way it will function with a Pardot form.
The Setup
Create the Pardot Form
First, create the form in Pardot, select the fields you want to use, select the form layout and save. Don’t worry about the ‘thank you’ messages yet, this will be edited later.
Add code to your web page
We will be using Magnific Pop-up jQuery Plugin to create the pop-up in Pardot.
Add the nessesary plugins to the page
Now this is the tricky part. In order to have the popup form and the gated content all on the same page, we need to tell the page when to show the form and when to hide the form. We can do this by using a URL parameter called ‘access’.
When the page is loaded the script will look for a parameter in the URL that looks like this:
http://yourlandingpageurl.com?access=yes
If the URL contains the parameter, the form won’t show on the page.
If the URL doesn’t contain the parameter, then the Pardot form will show.
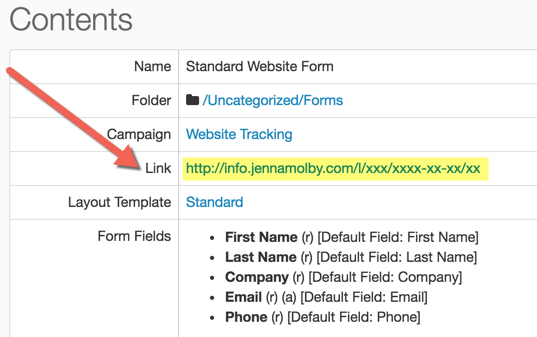
Update the http://info.jennamolby.com/x/xxxxxx/xxxx-xx-xx/xx with the link to your Pardot form. This can be found by navigating to your form in Pardot and copying the URL under Contents > Link.
Update the ‘thank you’ page settings
Now that the web page is setup, you can add in the ‘thank you’ page details in Pardot.
Check the setting for Redirect the prospect instead of showing the form’s Thank You Content‘ and set the redirect location to be the URL of your webpage PLUS the URL parameter.

VIEW DEMO *
* Note: The demo DOES NOT use a Pardot form, but is simulated the way it will function with a Pardot form.
Questions?
Send them to me via email, send me a tweet @jennamolby, or leave a comment

23 Comments
Hi, Jenna. Is it possible to make the form be sent by Ajax ? So that the “Thank you” message is displayed without redirecting and reloading the page.And without Pardot form after sending.
Thanks!
Hi Armi, No, I haven’t been able to get it to work with Ajax, due to CORS. Cheers, Jenna
Thank you Jenna for help )).
This was easy to follow, but unfortunately Chrome blocks the scripts.
Hi Sarah, Make sure if you’re implementing on a page that is https that you update the scripts to use https as well.
Thanks this is super helpful Would be interesting to add another cookie that also tells if the user has ‘unlocked’ this article so if they go back to the page without the url parameter it is still unlocked if they have a cookie. You can kinda do this with pardot (have them only use their email to get back in).
Does this technique still work for returning visitors? EG if it recognized the user, it will load the email field only – but will it understand submit on that should allow access to the page with the url parameter?
Hi Jenna
The link to the Magnific Popup JQuery Plugin appears broken. Do you have an updated link?
Cheers
Anne
Hi Anne, Thanks for letting me know. Here’s the updated link: http://dimsemenov.com/plugins/magnific-popup/
My boss wanted me to put up a splash page in a day where we could collect user info before they had access to the content. I could not figure out a good solution to get rid of the modal window on the pardot form submit for the life of me. Then I found this. It absolutely saved me. Thanks!