The 2nd part of the form customization series is finally here! In part 1, I showed you how to implement the popular floating label technique and how to create searchable, user-friendly dropdowns. In this post, I will show you how to create a conversational, paragraph-style form and how to create a form on a single line.
This is part 2 of the 3 part series. Have you come accross a form recently and didn’t know to replicate the functionality in Pardot? Share it with me in a tweet @jennamolby, or in the comments.
Create a paragraph-style form
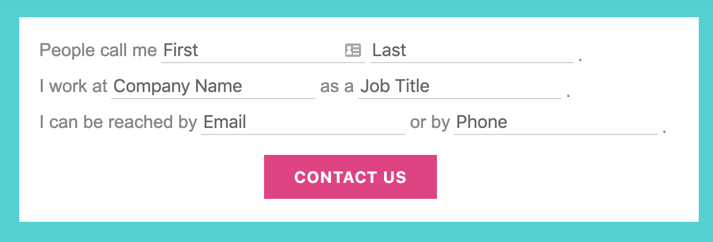
This “conversational”, paragraph-style form is a unique way to display your Pardot form. It requires editing your layout template and adding some custom javascript and CSS. Here’s a preview of what it looks like.
Edit your layout template
In order for this method to work, you need to make some updates to your layout template. Navigate to your layout template and click on the FORM tab. Replace the code with the code below.
<form accept-charset="UTF-8" method="post" action="%%form-action-url%%" class="form" id="pardot-form">
%%form-opening-general-content%%
%%form-if-thank-you%%
%%form-javascript-focus%%
%%form-thank-you-content%%
%%form-thank-you-code%%
%%form-end-if-thank-you%%
%%form-if-display-form%%
%%form-before-form-content%%
%%form-if-error%%
<p class="errors">Please correct the errors below:</p>
%%form-end-if-error%%
%%form-start-loop-fields%%
<div class="form-field %%form-field-css-classes%% %%form-field-class-type%% %%form-field-class-required%% %%form-field-class-hidden%% %%form-field-class-no-label%% %%form-field-class-error%% %%form-field-dependency-css%%">
%%form-if-field-label%%
<label class="field-label" for="%%form-field-id%%">%%form-field-label%%</label>
%%form-end-if-field-label%%
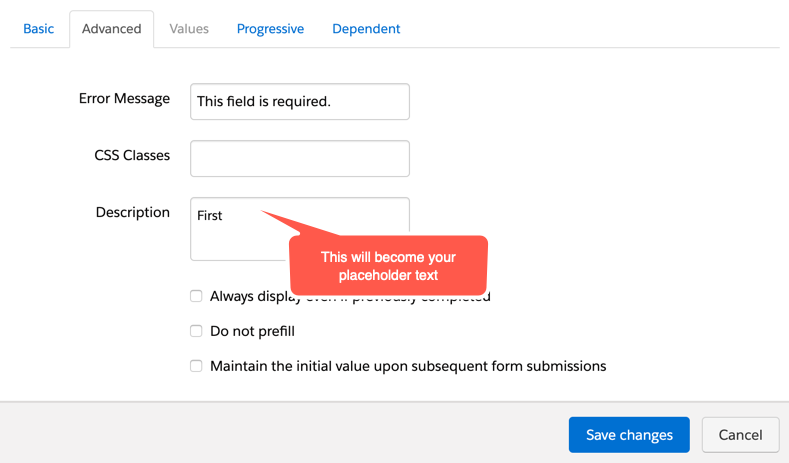
%%form-if-field-description%%
<span class="description">%%form-field-description%%</span>
%%form-end-if-field-description%%
%%form-field-input%%
<div id="error_for_%%form-field-id%%" style="display:none"></div>
%%form-field-if-error%%
<p class="error no-label">%%form-field-error-message%%</p>
%%form-field-end-if-error%%
</div>
%%form-end-loop-fields%%
%%form-spam-trap-field%%
<!-- forces IE5-8 to correctly submit UTF8 content -->
<input name="_utf8" type="hidden" value="☃" />
<p class="submit">
<input type="submit" accesskey="s" value="%%form-submit-button-text%%" %%form-submit-disabled%%/>
</p>
%%form-after-form-content%%
%%form-end-if-display-form%%
%%form-javascript-link-target-top%%
</form>What has changed?
The paragraph tags surrounding the inputs have been replaced with DIVs and the description code has been moved from after the input to before the input.
Edit your form
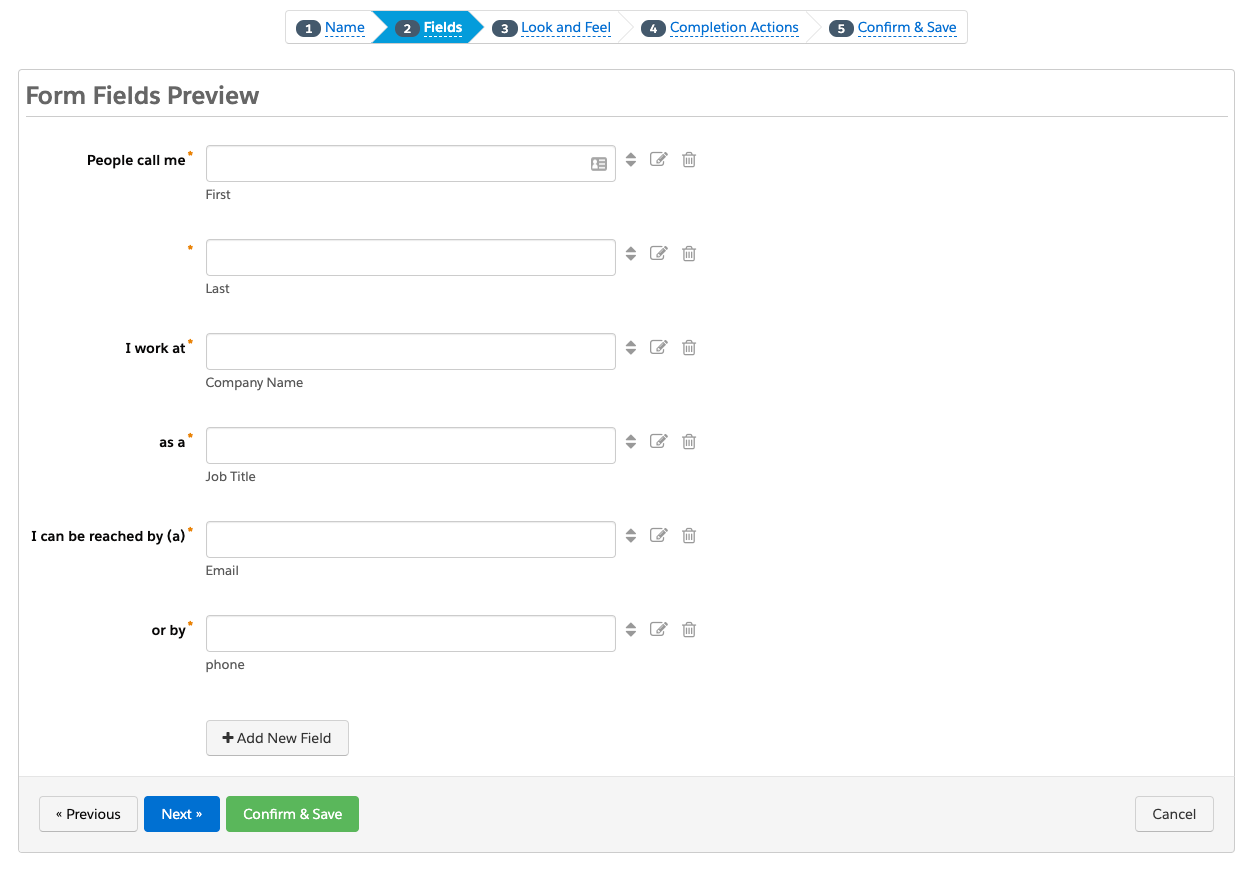
Since this is an advanced technique, the form setup is a bit unique. The labels within the form will act as the “paragraph text” and the description option will be used as the placeholders within the fields.
Here’s what the set up of my form looks like once the labels are updated and the description text is added.
Add the Javascript
This JavaScript will take the description text from the form and turn them into placeholder text.
<script type="text/javascript">
var labels = document.querySelectorAll("span.description");
var i = labels.length;
while (i--) {
    var label = labels.item(i);
    var text = label.textContent;
    label.parentNode.classList.contains("required") && (text += "");
    var nextElement = label.nextElementSibling;
    if (nextElement) {
        if (nextElement.tagName == 'SELECT') {
            nextElement.options[0].text = text;
        } else {
            nextElement.setAttribute("placeholder", text);
        }
        label.parentNode.removeChild(label);
    }
}
</script>
Add the CSS
The CSS is pretty straightforward. Float all the labels and inputs to the left, style the placeholder text and error messages.
<style type="text/css">

/* put the input fields on the same line */
form.form .form-field {
    float:left;
    clear:none;
    margin-right:5px;
    padding-bottom:10px;
}
form.form .field-label {
    font-size:18px;
    color:#888;
    font-family:Arial,Verdana,Sans-serif;
}
/* style the text inputs */
form.form input.text {
    border-bottom:solid 1px #ccc;
    border-top:none;
    border-left:none;
    border-right:none;
    font-size:18px;
    color:#888;
    outline:none;
}
/* style the select inputs */
form.form select {
    border-bottom:solid 1px #ccc;
    border-top:none;
    border-left:none;
    border-right:none;
    font-size:18px;
    color:#888;
    outline:none;
    -webkit-appearance: none;
   -moz-appearance: none;
   appearance: none;
   background:none;
   border-radius:0;
   width:200px;

}
/* insert line breaks */
form.form .form-field.line-break {
    clear:left;
}
/* insert periods at the end of sentences */
form.form .end:after {
    content:".";
    color:#888;
    font-size:15px;
    display:inline-block;
    top:5px;
    position:relative;
}
/* change the color of the placeholder text */
::-webkit-input-placeholder { /* Chrome/Opera/Safari */
  color: #888;
}
::-moz-placeholder { /* Firefox 19+ */
  color:  #888;
}
:-ms-input-placeholder { /* IE 10+ */
  color:  #888;
}
:-moz-placeholder { /* Firefox 18- */
  color:  #888;
}
/* center the submit button */
.form.form p.submit {
  margin-left:0;
  text-align:center;
}
/* give the form a width */
.form.form {
  width:100%;
  max-width:640px;
  margin:0 auto;
}
/* style the error messages */
form.form div.error {
    margin-left:0 !important;
    padding-left:0 !important;
}
form.form p.no-label,
form.form p.email-pref {
    margin:0 !important;
    text-align:right;
    font-size:11px;
}
form.form .error input.text {
    border-bottom:solid 1px #8b0000;
}
form.form .error input.text::-webkit-input-placeholder { /* Chrome/Opera/Safari */
  color: #8b0000;
}
form.form .error input.text::-moz-placeholder { /* Firefox 19+ */
  color:  #8b0000;
}
form.form .error input.text:-ms-input-placeholder { /* IE 10+ */
  color:  #8b0000;
}
form.form .error input.text:-moz-placeholder { /* Firefox 18- */
  color:  #8b0000;
}
</style>
Extra customizations
Bump the text to a different line
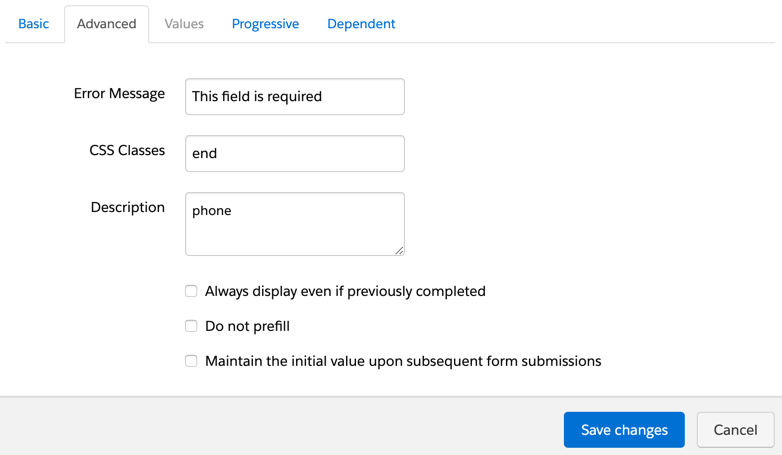
By default, the form fields will appear on a different line and wrap based on the width of your form. If you want to force a new line, navigate the form field that should start on a new line within the editor. Click on the advanced tab and add the class line-break as shown below.

Add a period to the end of a sentence
You can also add a period at the end of a sentence. Simply, add the class end where you want the period to appear.
The result
Minimal styling
Styled version
Create a form on a single line
I get a lot of inquiries on how to put form fields and the submit button on a single line. Now I have finally found the time to document it. Here’s an example of what the form will look like.

Edit your layout template
For this method to work, you need to make some updates to your layout template. Navigate to your layout template and click on the FORM tab. Replace the code with the code below.
<form accept-charset="UTF-8" method="post" action="%%form-action-url%%" class="form" id="pardot-form">
%%form-opening-general-content%%
%%form-if-thank-you%%
%%form-javascript-focus%%
%%form-thank-you-content%%
%%form-thank-you-code%%
%%form-end-if-thank-you%%
%%form-if-display-form%%
%%form-before-form-content%%
%%form-if-error%%
<p class="errors">Please correct the errors below:</p>
%%form-end-if-error%%
%%form-start-loop-fields%%
<div class="form-field %%form-field-css-classes%% %%form-field-class-type%% %%form-field-class-required%% %%form-field-class-hidden%% %%form-field-class-no-label%% %%form-field-class-error%% %%form-field-dependency-css%%">
%%form-if-field-label%%
<label class="field-label" for="%%form-field-id%%">%%form-field-label%%</label>
%%form-end-if-field-label%%
%%form-field-input%%
%%form-if-field-description%%
<span class="description">%%form-field-description%%</span>
%%form-end-if-field-description%%
<div id="error_for_%%form-field-id%%" style="display:none"></div>
%%form-field-if-error%%
<p class="error no-label">%%form-field-error-message%%</p>
%%form-field-end-if-error%%
</div>
%%form-end-loop-fields%%
%%form-spam-trap-field%%
<!-- forces IE5-8 to correctly submit UTF8 content -->
<input name="_utf8" type="hidden" value="☃" />
<p class="submit">
<input type="submit" accesskey="s" value="%%form-submit-button-text%%" %%form-submit-disabled%%/>
</p>
%%form-after-form-content%%
%%form-end-if-display-form%%
%%form-javascript-link-target-top%%
</form>What has changed?
The paragraph tags surrounding the inputs have been replaced with DIVs.
Add the CSS
<style type="text/css">
/* put the input fields and the submit button on the same line */
form.form .form-field {
    float:left;
    clear:none;
    margin-right:10px; /* add some spacing between the fields */
}
form.form p.submit {
    float:left;
    clear:none;
    margin-left:2px !important;
    margin-top:0 !important;
}
</style>
The result
Minimal styling with one field
Minimal styling with multiple fields
Styled with one field
Styled with multiple fields
Questions?
Send me a tweet @jennamolby, or contact the Sercante team for help.